With the significant use of Google Tag Manager, one can add or manage tags on their website and mobile app without hiring an IT development team. So, you will be able to manage tags on your website by using Google Tag Manager, a free tool that enables you to add tags without changing the code and efficiently boost your conversion rate.
What is Google Tag Manager?
If you want to add any updates or manage various marketing tags without changing the website’s code, then you can use Google Tag Manager. It is a free and user-friendly tag management tool that will let you make modifications to your website without changing the initial code.
With the effective use of Google Tag Manager, you can easily track and analyze conversion tracking, remarketing, and cookies management. Google Tag Manager has an intuitive interface, preview, and debug tools for testing tags before deployment.
With the use of auto event triggers and automated tag firing, you can control and allow users to revert to previous tag setups whenever they want to.
Benefits of using Google Tag Manager
Different types of benefits of Google Tag Manager are discussed below:
- Simplified tag management: Google Tag Manager allows you to manage multiple tags on a single platform and easily track and optimize each tag’s performance.
- Error-free tag updates: Google Tag Manager allows you to make changes to tags without technical guidance and also, minimizes the risk of human errors. It implies no manual code method, so one can make changes or manage tags easily with the help of GTM.
- Strategy over coding: With the help of Google Tag Manager, you can focus on different strategies and optimization processes rather than investing your time in developing the code base for managing the tags.
- Increased efficiency: Google Tag Manager will enable you to focus on the management of tags and make resources free so they can aim at more important tasks. It reduces time and increases the work efficiency.
Descriptions | Examples | |
Tags | A tracking pixel is a small piece of code or a tracking pixel inserted onto a website to track a particular action or conversion rate. | Google ads conversion tags. |
Trigger | A trigger in Google Tag Manager is an event or condition that will fire or execute a tag. | Page View Trigger |
Variables | A data element that controls the tracking tag, such as a conversion ID or conversion label. | Conversion ID or labels. |
Creating a GTM account
Step 1: Visit the Google Tag Manager website. The first step in this tutorial involves visiting the official Google Tag Manager website. This is the beginning of your road to setting up your GTM account.
Step 2: Sign in with your Google Account. If you already have one, sign it with your credentials. You can also create a new one since Google offers the GTM product and authenticates using Google Accounts.
Step 3: If this is your first time, click the Create New Account link from the Google Site URL. If prompted to sign in, you need to create an account by clicking the Create Account button, entering your information, and finally, typing in the company name and country.
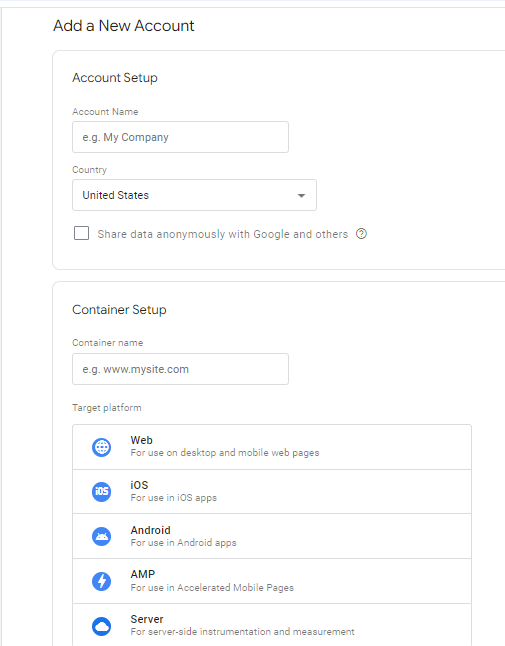
Step 4: Select the target platform. At this stage, you’ll need to determine the target platform for your GTM container. Since you are most likely setting up GTM for a website, select “Web” as your target platform.
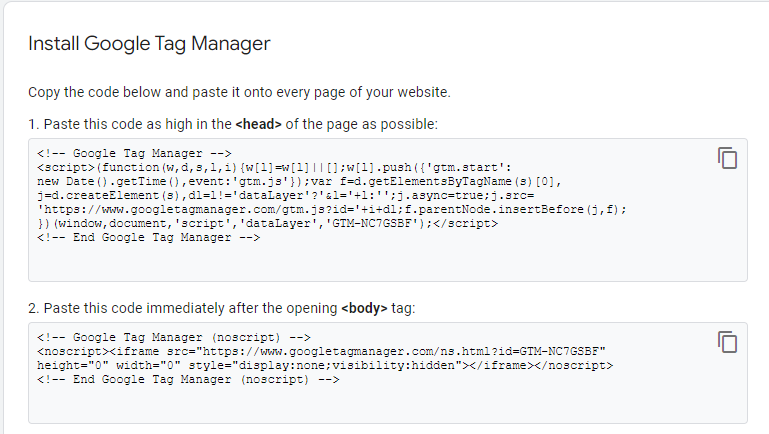
Step 5: Installing the GTM Container Code. After creating your GTM account, you must install the GTM container code on your website. Installation can be done as follows:
- Log in to your GTM account and access the “Admin” area.
- Click “Install Google Tag Manager” and copy the two code snippets you have been given.
- Copy the first code and put it in the <head> section of your HTML.
- Add the second code snippet to your HTML within the <body> section.
Step 6: Basic Settings Configurations. Once the GTM container is installed, you can proceed with the configuration of basic settings:
Access via your GTM Account. Manage user permissions and set up different roles and permissions by assigning access to see and control your GTM account. You must create various testing, staging, and production environments to smooth the tag’s management and cause no interruptions.
Link your Google Tag Manager account to Google Analytics and other Google services. This is a way your Google ads audit would be carried out in a seamless manner and your tags will be managed effectively.
Google Tag Manager vs Google Analytics
Google Tag Manager:
- Purpose: The main objective of Google Tag Manager is to deploy and manage the tracking tags of your website without changing the codes. In simple words, one can easily implement different changes without the need for a development team.
- Functionality: Google tag managers are responsible for holding all the tracking codes as they act as single containers for managing all the tags. You can insert the Google Tag Manager container code rather than investing your time in multiple scripts.
- How it works: Google Tag Manager uses container code on your website and collects all the codes within the same container. GTM allows you to easily make changes and add various tags, triggers, and variables on your dedicated website. Also, they are responsible for firing the defied trigger at the right time.
- Data collection: Google Tag Manager uses a management system to facilitate the sending of tracking of different types of data to various platforms including GA4 and many more analytics tools. Google Tag Manager does not store or analyze the data on its own. Also, Google Tag Manager guarantees to send data which is based on the tags and triggers.
Google Analytics:
- Purpose: Google Analytics’ main objective is to provide web analytics services that track and monitor website performance, such as tracking ID, conversion rate, and bounce rate.
- Functionality: Google Analytics allows you to easily gather and track data from visitors to your website. It is responsible for tracking page views and button clicks. With the effective use of Google Analytics, marketers can easily make detailed reports and make data-driven decisions that can help their website grow.
- How it works: Google Analytics lets you implement any code directly on your website. Its main objective is to collect all the interaction data and send it to the GA4 dashboard. You can also utilize this data to learn more about your users’ behavior and how they engage with your website.
- Data collection: Google Analytics can collect and track data sent through Google Tag Manager directly or with different tracking codes. It is responsible for processing the data, generating more detailed reports, and analyzing user behavior to give you better insight into your business and website performance.
Different types of Google tag manager tags are mentioned below:
Google Analytics tags: Set up GA4 tag manager because it allows you to create events in Google Analytics. Using this tag type, you can send several types of data to Google Analytics, including page views, events, transactions, social interactions, as well as custom timings.
Use Google Analytics GA4 Event tag so you can track thousands of different actions that someone may take, like how many people scrolled down through a page, how many people viewed a page, how many people clicked on a button, how many submitted forms, purchased a product, and much more. You will gain a lot more insight into what your users are actually doing on your website or application by tracking these events.
In Google Tag Manager’s left panel, click Tags → New button → Tag Configuration Google Analytics → Analytics: GA4 Event.
Google Ads conversion tracking: Conversion tracking is a tag that allows you to forward any conversion data to Google Ads. You can use it to measure users’ different actions on your website, like filling up a form, making a purchase, or signing up, and then correlate them back to one of your Google Ads campaigns.
However, you need to include a conversion ID and conversion label from a website conversion action that should have been configured beforehand in your Google Ads account. This will ensure proper conversion data reporting against the correct campaign and also ad group. Another related feature is the conversion linker, which helps connect your website’s conversion data with the Google Ad campaigns that originated traffic.
A conversion linker allows you to have more comprehensive insight into how your Google Ads campaigns are performing and make data-driven decisions that can optimize ad spend.
What are triggers, and how do you configure them?
A trigger in Google Tag Manager is an event or condition that will fire or execute a tag. A trigger determines when and how a tag will be triggered, allowing you to define the exact conditions under which the tag should send data to Google Analytics. Some common examples of triggers are page views, clicks, as well as form submissions.
To build a trigger group:
- Select Triggers New.
- Select Trigger Configuration and choose Trigger Group.
- Select the two or more triggers from your container.
- Click Add.
- Optional: If you want to force multiple instances of the same trigger, click again and select the trigger. You do the same thing for however many times you want that same event to happen before the trigger group fires.
- Click Save.
How to use variables for dynamic tracking?
The main aim of variables is to capture and store values whenever a user interacts with an application or a website in real-time. Variables store different information, such as page URLs, user IDs, or click events. They can also be used to determine the condition of the trigger fire, and you can set the trigger to activate only when specific variables meet certain criteria.
For example, whenever a person or a customer tries to click on a button that contains a specific text, the trigger gets activated. Also, variables are responsible for sending the data to third-party measurement and analytics tools.
Types of variables
There are two types of variables. Let us discuss them:
Built-in variables: Built-in variables are predefined variables that users can use without any extra setups or coding. They are designed to track needs and streamline the data collection process.
Using the built-in variable user interface, users can easily track and analyze tasks. It is considered one of the most effective tools for website and application analytics that doesn’t require extensive technical knowledge.
User-defined variable: User-defined variables are custom variables that a user can create to custom-capture specific data points not covered by the in-built variables. This self-sufficiency suggests that businesses and owners of websites tailor their data collection to meet unique tracking requirements and gain deeper insights into what users do.
How to check if Google Tag Manager is working?
To check if the Google Tag Manager is working then, follow the given steps:
- Examine the website source code (and in the “Search” feature)
- Switch Preview and Debug on
- Go check Google Tag Assistant
- Use Screaming Frog
- Open the developer tools of Chrome
- Check Google Analytics real-time reports or DebugView in case any events or pageviews are configured.
How do you give someone access to GTM?
If you want to give access to Google Tag Manager to someone, follow the given steps:
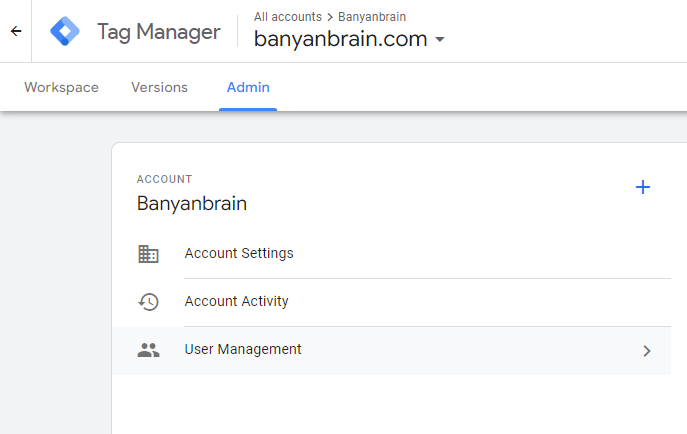
Step 1: Click Admin in the GTM account
Step 2: In the account column, select user management.
Step 3: Select add new users
Step 4: Enter one or more email addresses
Step 5: Set account permissions
Step 6: Optional: Set container permissions for each container you would like the user to access.
Step 7: Click invite
Common Google Tag Manager mistakes and how to avoid them
If you want to implement Google Tag Manager to avoid some of the common mistakes, then the points are mentioned below:
- Do proper tracking and effectively manage your tags by avoiding common mistakes when implementing the Google Tag Manager. A common mistake is that people install the GTM snippet improperly. This may compromise the accuracy of collecting data.
- Another common mistake is not having organizational aspects of your tags. This will lead to inefficiency and also errors if your GTM container gets very large as more and more stuff grows onto it.
- A common mistake is using outdated tracking codes. Whenever you create a new design for your website, you must update your tracking code. Otherwise, it will become outdated and inaccurate.
- Another common mistake is the inconsistency in naming conventions, which makes your GTM account hard to maintain and troubleshoot. Establishing a clear naming convention helps avoid confusion and makes tags easily identifiable.
With GTM, it is possible to improve the optimization of marketing approaches as well as better user experience. However, the bottom line is that there is a greater chance of conversions and revenue generation.
Business entities avoid the most common mistakes that have been associated with GTM by making sure that tracking tags are undertaken accurately and managed efficiently.

Banyanbrain is an online marketing company that provides services such as SMO, voice search optimization, and technical SEO audits. Contact Banyanbrain for such services.
FAQs
How to use Google Tag Manager?
If you plan to use Google Tag Manager, you need to start from its account, get the GTM container code on a website, and then set up basic settings. After this, with the help of GTM, you can add the tags, triggers, and variables that capture those web interactions and conversions, use the same GTM interface to manage the tags, track them, and check your performance in Google Analytics.
How to use Google Tag Manager with Google Analytics?
Link your GA account with GTM and create a GA4 Event tag in GTM. Configure the tag to forward the data to GA and add triggers that fire the tag on specific events. Thus, with such settings, you can follow the interactions and conversions generated within your website in GA, along with insights concerning user behavior.
How to set up events in Google Tag Manager?
To add events in Google Tag Manager, create a trigger and choose an event type. Using the event types, such as page view, click, and form submission. Configure the trigger settings. Then, specify which element or URL will be tracked with its help. Then, create a tag and attach this tag to the trigger that you had chosen earlier. Then, indicate the kind of data to be sent to Google Analytics or other platforms.
To set up tags in Google Tag Manager, create a new tag and then select the tag type, such as Google Analytics or Google Ads. Further, set up the tag settings. You will likely need to specify the tracking ID or conversion ID. After this, create a trigger by which the tag fires, specify the data that should go to the platform, and finally publish the tag that you have set up to roll it out to your site.